Showing posts with label 2018. Show all posts

Reading Lights Up Your Mind


For the December board, I chose a color palette, style, and went for as non-denominational seasonally themed as possible. As a library we decorate for all the festivities within the season and community, however, I felt it was almost impossible to include all that information on one board with time constraints on creating my board as well. In the end, I created something festive that all could enjoy.


Technique
  • Accucut Die cutter with light bulb die and various shades of gold scrapbook paper.
  • Baker's twine and tape for "stringing" lights.

This simple, yet festive board states, "Reading Lights Up Your Mind." Using the wooden floor background, gold and silver tinsel for the border trim, a combination of gold and silver 4-inch letters, and handmade light bulb banners (4) created the subtle holiday board. The only complaint/issue was the color palette was too similar. My wording disappeared a bit into the background. I would have like copper-colored letters had pre-made letters in that selection existed or the ability to find metallic copper paper to create my own letters. If someone knows of such things let me know for future use, please!


How did you like this theme?


Get Caught Up in a Good Book!


Still, on a slight minimalist kick, the October board featured the purple background from February's Mardi Gras themed board, silver and black border trims, a chenille-type spider web complete with button and pipe cleaner spiders, and ghastly book titles for a haunted read!

Supplies
  • Bulletin board background - purple
  • Border trims - black and silver
  • Accucut die cuts - open book and ghost
  • Chenille Spider web or black garland
  • Construction paper - lime green (books), white (ghosts)
  • Alphabet Stickers - black
  • 4in Letters
  • 1in buttons 
  • Chenille Stems/Pipe Cleaners

Technique

  • Using the accucut die cutter with the open book die to create several book shapes. I chose lime green paper - you may use whatever suits your fancy.
  • Repeat with the ghost die to create two ghosts to use in lieu of the "O" in "books".
  • After cutting my book shapes I applied the alphabet stickers to create my book titles. If you have a fancy handwriting style you can opt for that instead of stickers, but since my letter lady assistant and her fancy handwriting left our branch, I'll be using stickers in the meantime.
  • Spiders: Using 1in buttons that have 4-hole openings, insert 2 chenille stems across each set of holes and then fan out the "legs" bending as needed to create the spider look. You may need to trim your stems depending on your length preference.
  • After draping and stapling your spider web (faster) or creating your web from garland (still easy enough) add your chenille and button spiders by stapling to the board. *Note - stapling a top and bottom leg will secure the spider though they can be easily removed.
  • Add letters to create your display title and staple the book titles in a haphazard way. 
What do you think? Let me know!


Library cards are INCREDIBLE!


Still taking a little break after all the fun of summer reading. However, September is exciting! It's library card sign up month! Each child who registers with a new library card receives a pencil, sticker, and a raffle ticket for the drawing at the end of the month. Children already having a library card also receive a pencil, sticker, and raffle ticket for showing their card at the desk during the month - no check out necessary!

This board followed the same technique as last month's - using Canva to create decorative fliers for the board. It's also on the same background but with different borders.

What are some of your September themed boards? Let me know!


National Vision and Learning Month


After all the fun of Summer Reading coming to an end, the August board felt a little blah, but like everything/everyone else in the library, it was taking a bit of a break. I used the August board to focus on Back to School issues - National Learning and Vision Month.

Technique

  • Using Canva and reputable websites (www.aoa.org) I created several decorative yet factual posters.
  • With the Accucut Die cutter eyeglasses were created for a confetti affect.


The background was a simple burlap printed background with hues of aqua and coral as well as a retro-styled aqua border. The effect is easy on the eyes though I was a bit dismayed that the burlap was not more distinguishable.


What are some themes you have used for August? Let me know!


Libraries Rock!


The June/July Children's board showcases the Summer Reading theme - Libraries Rock! This board includes features from a previous board, March (Women's History Month), in its design. To minimize some fluster on my end, I selected four musicians with four different instruments with a focus on the same or similar musical styles. 


Musician Layout

  • Musician Photo
  • Name in calligraphy
  • Song quote
  • Informational Sheet
Each of the four musicians has the layout above. Pictures and other items are cut and placed onto a background paper as a border or frame. Additionally, the photos are "framed" with paper photo corners. This is not necessary but I felt added an extra touch. Paper photo corners were created with a Martha Stewart paper punch.


Instruments

Each instrument was created using a template. Each template is linked below.

  • Guitar
  • Violin/Fiddle
  • Piano
  • Banjo
Materials used include chip board (all instruments except piano), card stock or heavy construction paper (piano), sharpies (black and paint/metallic silver), white construction paper, xacto knife, and fishing wire.

Instruments were created using the template initially, as an outline on the chipboard (minus the piano) and then detailed using the template and referencing actual instruments either online or in a book.


Board background is a wood floor printed background with patriotic swag trim on the main board and metallic blue trim on the informational side.


To encourage further reading, each musician/musical instrument grouping includes a fun shaped die cut resembling a chalkboard with call numbers for additional information pertaining to either the musician or the instrument. A small book display was created featuring some of the musicians on the board as well as others within a similar music family.


What do you think of this board? What might you do differently? Let me know!


Spring Into A Good Book!


The May board was a simple spring theme. I had wanted to do paper flowers but the technique for creating them was too involved for my time span. Instead, I opted for brightly colored pinwheel flowers.

Technique

Materials

  • Large construction paper sheets - 10x12 (large) and 6x6 (small)
  • Scissors or paper cutter
  • Pencil 
  • Ruler
  • Hot Glue
  • Bone folder

Large Pinwheels:

  1. Use large sheets of construction paper, trim the excess if needed so the sheets measure 10x12.
  2. Fold the sheet in an accordion method.
  3. After creasing sheet in accordion method fold in half lengthwise.
  4. Glue ends together creating a V-shaped petal.
  5. Repeat steps 1-4 twice to create a total of 3 V-shaped petals.
  6. Glue all V-shaped petals together to create one large flower.
  7. Repeat steps above as needed to create additional flowers.
Large pinwheels utilize 3 large sheets folded according to the methods above and glued together.

Small Pinwheels:

  • Use the same method above but trim the paper to 6x6.
Small pinwheels will also use 3 sheets.

Finish each wheel with a circle for the center. I used largest and smallest sized circles from the die cutter at my branch. Be creative! You can use any design for the center - it doesn't have to be a circle. After creating all my flowers, I laid out my design then hole punched the tops of the flowers. Next, using cotton cord I strung the flowers together creating a swag. I applied my swag after resetting my background and borders. Using staples and thumbtacks, I looped the ends of the swag and stapled/tacked them onto the board for display. This part was a bit tricky - you just have to work with it to get the desired effect. The letters/words were added after the swag so I could determine the best use of space for the board.

How did you like this board? Have suggestions? Let me know!


Celebrate National Library Week!


Choosing a theme for April seemed a little daunting, at first, as there are many themes/events for the month. Despite all my options I chose to celebrate Library Week, April 8-14, by creating a bulletin board sized book cover illustration of Shel Silverstein's "The Giving Tree".


This board went up faster than some of my previous designs, as I was able to reuse the current board background and also did not have to remove much of the current border trim. Using various tones of green construction paper I created leaves using an Accucut die machine with a maple leaf die. After cutting several envelopes worth of die cut leaves, I used strips of poster board to make tree branches. The poster board was cut in strips 2 inches wide by about 7 inches long - you can alter the size for your needs.

Technique

Trunk:
  • Use 8x12 sheets of brown construction paper.
  • Line your pages against one edge of your board and staple in place.
  • Overlap pages as necessary.
Branches:
  • Staple leaves onto 2x7 poster board strips in 3 layers. 
  • Trim off the top stems if you wish.


Boy:
  • Locate an image of the boy using google image search.
  • Print this image at 100% or whatever percentage fills/fits the page.
  • After printing, cut out the image and glue to poster board (you can also glue to poster board and cut everything at once).
  • To define the boy, color over existing colors with markers or colored pencils.
Apple:
  • Accucut die cut in apple shape with red construction paper.


Thoughts or comments? Let me know!


March Into Women's History


March into Women's History Month! Initially, I set out to do a St. Patrick's day theme but the balloons for my rainbow arrived too late - there's always next year. Instead, I took to last-minute task and researched ladies for an educational board. Using the S.T.E.A.M. model (Science Technology Engineering Art Math) I searched for at least two extraordinary women per area. I had a few favorites who I included as well.

After researching each woman, I created a short bulleted bio using Open Office. Pictures of each person were sourced via google images and printed. I had my lovely assistant use her faux calligraphy skills to draw the names of each woman.
Photos, bios, and names were all trimmed to size and glued to scrapbook paper. Using the Accucut die cutter, a book-shaped die cut, and my favorite gold metallic paper I created many book-shapes. These were used as board confetti. This was a simple board compared to some of my others but it is necessary to have simpler boards as a "rest" period between more intense boards.

What board did you create this month? Let me know below!

And the Winners Are....


February's board displayed Children's Literary winners so a festive Mardi Gras theme seemed more appropriate (and fun) than a typical Valentine's Board.  Additionally, the winners were not announced until halfway through the month making this board a fun, interactive board in which the winners were revealed at a later date.

Technique


Materials

  • Mask template
  • Xacto knife or scissors
  • Pencil
  • Decorative cardstock or heavy weight construction paper
  • Trim - feathers, glitter, sequins, flat back rhinestones, foil stickers, paper punches in festive shapes, etc.
  • Tacky Glue
  • Washi tape* (optional - can be used also for decoration)
  • Paper Straws
  • Metallic paper (shiny on one side) for Question marks


Masks

  1. Using this template sourced online, I printed it twice and cut out two originals. One for me and one for my helper - just print and cut the templates for your needs.
  2. Trace the original template onto card stock.
  3. After cutting out masks: decorate!
  4. Paper straws used for handles were attached in different ways: one method is using the tacky glue and additionally gluing construction paper strips over the straw to secure it; the other is to take the washi tape in the same manner but without the glue.
  5. After decorating and applying the paper straw handle your mask is ready!
Question Marks
  1. Using a question mark found online I enlarged the image, printed it, and cut it out creating a template.
  2. Trace template backward on the wrong side of the metallic paper.
  3. Cut out and enjoy your metallic question marks!

Making the masks was definitely the best part of this masterpiece board, yet, the whole vision came together beautifully. Category names were supplied by the Children's Librarian - they are laminated and reused each year. The book images were color printed on printer paper. Mardi Gras themed feather boas from the dollar tree made a wonderful border for the main board paired next to metallic yellow border on the informational side of the board. The backdrop of shiny purple, the metallic letters, gold painted staples, rhinestone push pins, and metallic fleur de lis sprinkled about created a festive environment for showcasing this year's winners! Enjoy! 

Feedback or suggestions? Let me know!


Reel in a WHALE of a Good Book


January's Bulletin board was decided by my branch manager. This bulletin board design is my recreation of someone else's design. The original image was found on pinterest but the uploading user may not have been the creator of this elaborate board. I did message the person who uploaded the original image on pinterest, in hopes of finding exact templates, but no luck.

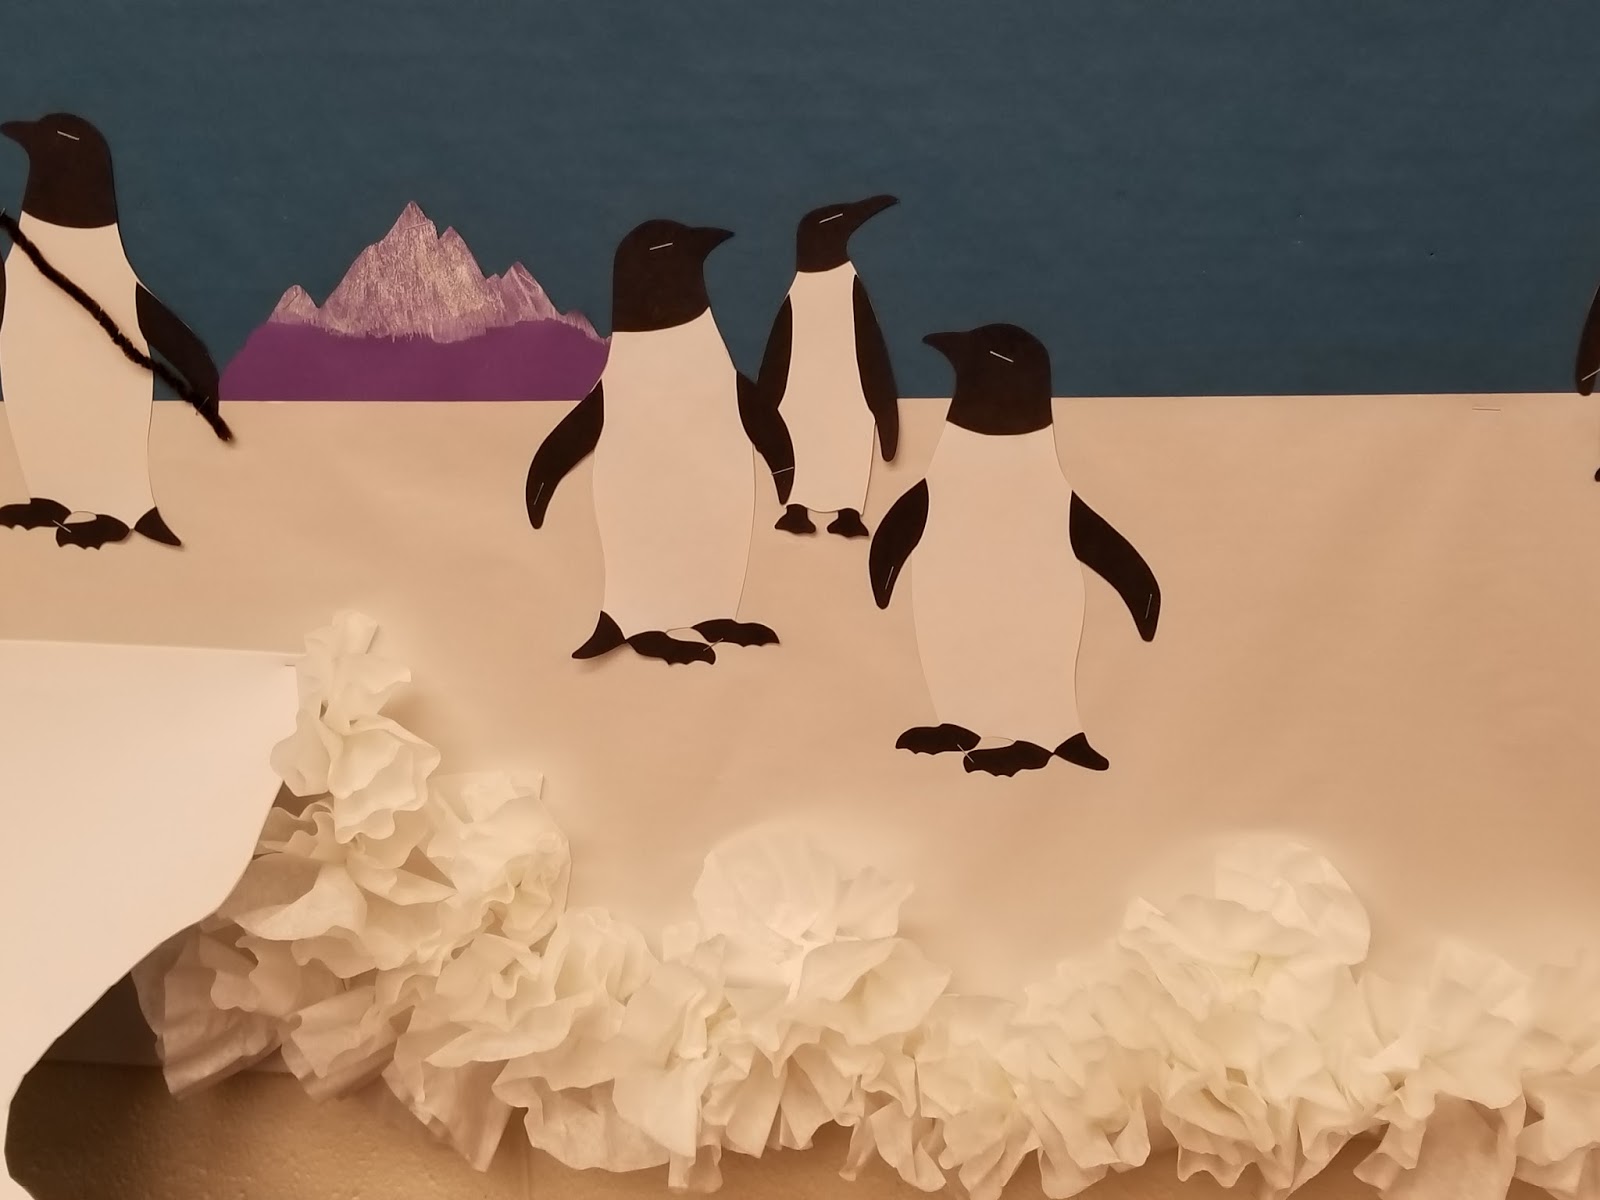
This bulletin board was not linked to a blog, therefore, having no actual directions for creation. To date, I feel this is my best work. This board is very detailed with lots of effort into designing and creating the penguins and the whale.


Six of the penguins (including the fishing penguin) were created with this template. 

The three background penguins used this template.

Penguins were traced onto white construction paper and cut out. The black details were also traced (separately) onto black construction paper, cut out, and glued to the white penguin. 


Baby penguins were traced from a template with details added by free-hand using markers.


The whale's tail and body was a free hand creation as well using the bulletin board image as a reference. The whale body was then glued in stages to the "water" board. Water was created with chip board and duct tape with blue paper glued on top.


Purple mountains designed from this template and snow capped tops created with white poster paint and glitter.


Snowflakes at the top were re-used from last month's bulletin board. 


The fluffy snow at the bottom of the board is 12 cup coffee filters scrunched and stapled to the board. The original image looked like it included aurora borealis colored cellophane for the snow but I wanted to work with what was available to me. 


The ice fishing hole used two pieces of craft foam with the hole (a half circle in each piece) in the middle. Blue paper matching the water/whale board is taped underneath the hole for the illusion of water. A fishing penguin is holding a pole, made of two pieces of pipe cleaner twisted together and bent in a cane shape. Cotton string is attached to the end of the penguin's fishing pole, dropped through the ice fishing hole, and taped to the whale board.


If you have any questions regarding this board or re-create it please let me know! I love seeing other's inspiration!